hair
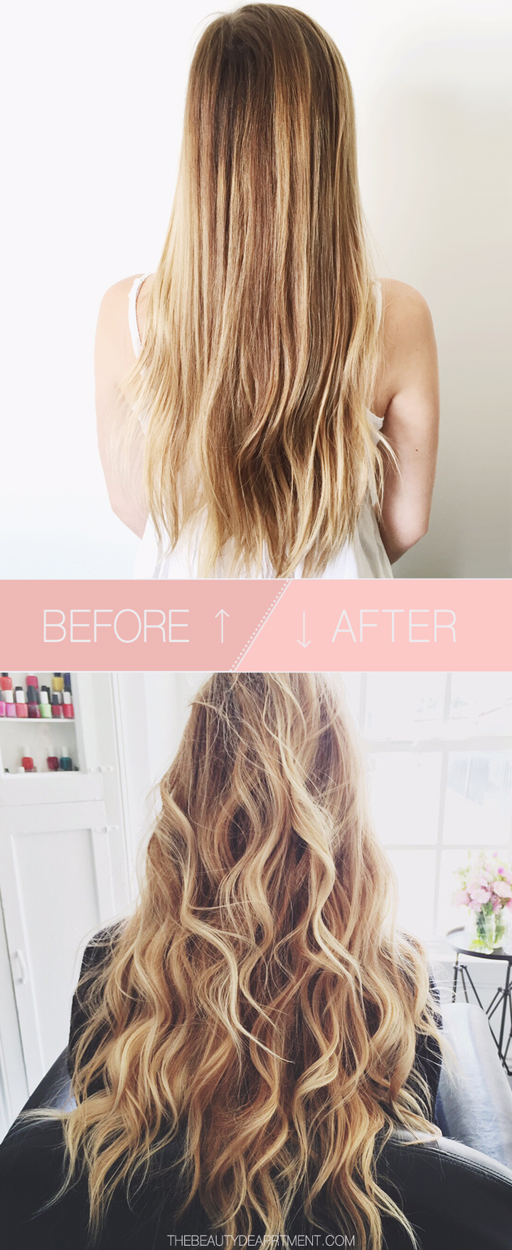
HOW TO CREATE THICKER LOOKING HAIR
PHOTOS/POST: KRISTIN ESS
PHOTOS/POST: KRISTIN ESS
Let’s have a real talk moment, please. The two photos above are of the same person. The top photo is nice, normal/fine, everyday hair while the bottom hair is what I like to call “internet hair”. You know what I’m talking about– the type of hair that’s totally attainable but not at all realistic for every moment of every day. “Internet hair” takes work! In this post I’m going to give you my top !!! ways of making your everyday hair into thicker, fuller, epic hair, even if it is just for a special event, an instagram pic or your own blog! Sounds silly but you’d be surprised at how often I get a request for “more photogenic hair”.
- First things first, if your hair is fine and limp, you’ll need some extensions. That’s just the way it is. We use them on photoshoots and if you’re trying to pump up your hair, extensions are the way to go. You can either do some TAPE-INS or you can grab some CLIP-IN TRACKS. Make sure they have demensional color, meaning some highlights and lowlights. Variation in the colors will give your hair more dimension and will allow the texture to show up more.
- Prepping your hair with product is essential. I’m a less is more kinda gal when it comes to products on a daily basis, but for this type of hair there’s no way around it. You need product support here. I like to use a volumizing mousse, like LIVING PROOF FULL THICKENING MOUSSE or ORIBE GRANDIOSE (at the ROOT only). Neither of these two have ever felt “sticky” in my hair or in my clients’ hair. They give volume without feeling product-y.
- Next up I spray ORIBE THICKENING SPRAY from middle to ends. You can skip the mousse and use this at the root if you want but I prefer the strength of the mousse at the root.
- I flip the hair back and forth and upside down while blowdrying because I like to get the hair up off of the root so it’s not laying flat against the head. I also don’t round brush a lot because it smooths the hair too much and I want all the volume I can get. I round brush the bangs or the hairline and maybe a tiny section at the crown, just to remove wave pattern or cowlicks.
- If you plan on parting to the side, use THIS VOLUMIZING TRICK from our previous post! It is SO helpful for side parting with volume.
- A favorite trick of mine is to put the hair in a FUN BUN to cool for 5 or so minutes after you’re done blowdrying. It helps the hair set in a more voluminous way. Then I take it down and curl.
- Very important when going for thicker looking hair, switch between the curling iron and the wand LIKE WE DID HERE, or go wand all the way. When you use a curling iron with a clamp, you’re squeezing the hair between two hot plates so it’s technically polishing and also lessening the volume. When you wrap it around a wand, you get fuller, more bouncy voluminous curls because it’s not getting flattened between two hot plates. If you love the curling iron curls using the clamp, just be aware that they’re not going to be as full as they will if you wrap or wand them! Try to go at least half and half LIKE THIS!
- I just started using LIVING PROOF THICKENING CREAM and I’m obbbbbbbsessed. I’m probably using it wrong but yolo. I’ve tried it on the hair when it’s wet as well as using it after it’s dry to style and I LOVE it for that even more than I do on wet hair. In the bottom photo, I scrunched it into the hair instead of using my normal pomade x serum combo.
- I like adding a quick shot of tinted dry shampoo like KLORANE at the root to make sure the hair doesn’t get oily too quickly. That often happens with fine hair!
- Finish the hair off using a strong holding DRY hairspray like R+Co Strong Hold Flexible, Redken Triple Take 32, or Sexy Hair Spray + Play Harder. These are my faves for volume because they’re dry and almost powdery when you spray them. They don’t feel wet like a lot of other hairsprays do. These 3 go on dry and hold really well boosting up your hair in a major way.