makeup
FULL COVERAGE FOUNDATION MAGIC
TUTORIAL + PHOTOGRAPHY BY AMY NADINE, GRAPHIC DESIGN BY EUNICE CHUN
TUTORIAL + PHOTOGRAPHY BY AMY NADINE, GRAPHIC DESIGN BY EUNICE CHUN
Cream foundations offer the most coverage option of any foundation. If you want to knock out dark spots, acne and acne scars and redness, it’s definitely your best solution. They also last longer than liquid foundation. But sometimes they are a little too cakey and opaque, making the skin look less alive and more what I like to call “news caster”. I also hate it when it just sits on top of the skin then comes off on my phone and anything it comes in contact with. But there is a way to break it down a little and make it become more one with its environment. When you apply primer first, then mix the same primer into the foundation, the molecules from the primer on the skin and the primer in the foundation attract each other and blend seamlessly. When you mix primer instead of lotion or cream into cream foundation, you keep the full coverage but make it more wearable and less cakey.

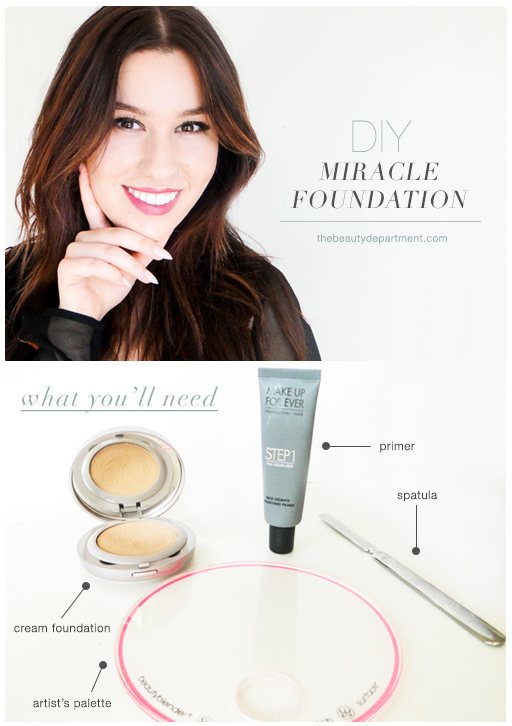
TOOLS:
- Cream Foundation — I used this favorite one ($$$) but also love this industry standard ($$) and this drug store version ($).
- Primer — There are tons of primers out there now for every need (hydrating, redness correcting, mattifying, radiating) . I used this smoothing primer ($$) on Magali but this one ($) is amazing too. A hydrating or radiating primer will break down the foundation more than a correcting, smoothing or mattifying primer, so keep that in mind if you don’t want to lose coverage.
- Spatula ($) (or you can use a dull knife)
- Artist’s Palette ($$) (or you can use your counter or palm of your hand, just make sure each are clean)
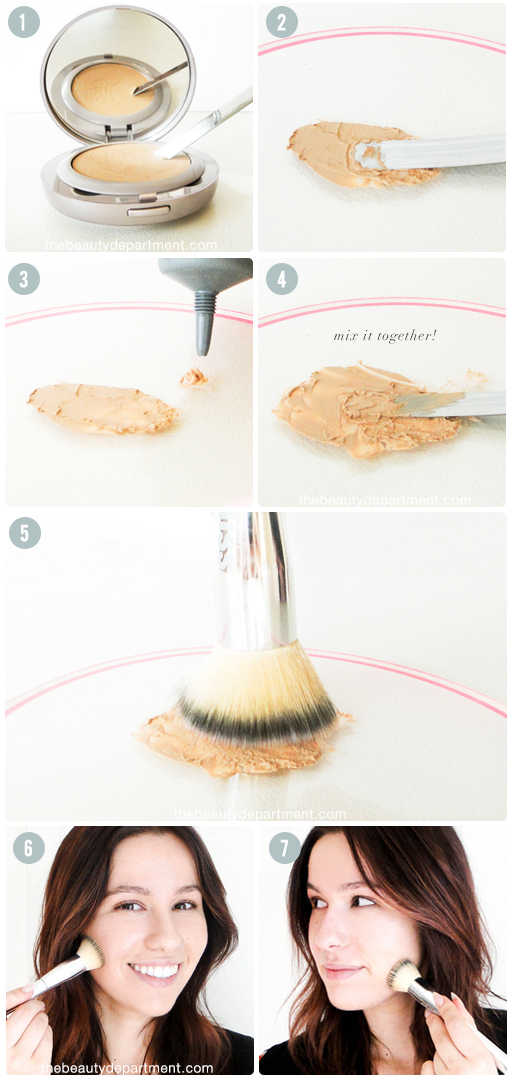
STEPS:
Prep: Apply the primer all over your face.
- Skim a nickel-sized amount from the surface of the foundation with the spatula. This works the same if you are using a cream foundation stick as well.
- Flatten it across the artist’s palette repeatedly to thin it out.
- Squeeze a small amount of the primer onto the palette. (You can squeeze it directly onto the foundation “pile” instead of next to it, which I only did for photographic purposes,)
- Mix the two together with the spatula. If you’re using your finger, just swirl them together.
- Dip your foundation brush into the mixture to load it up.
- Buff the brush across your skin in circular motions.
- Continue all over your face and neck until you have the coverage you need.