makeup
BLUSH + CONTOUR CHEAT SHEET
TUTORIAL + PHOTOGRAPHY BY AMY NADINE, GRAPHIC DESIGN BY EUNICE CHUN
TUTORIAL + PHOTOGRAPHY BY AMY NADINE, GRAPHIC DESIGN BY EUNICE CHUN
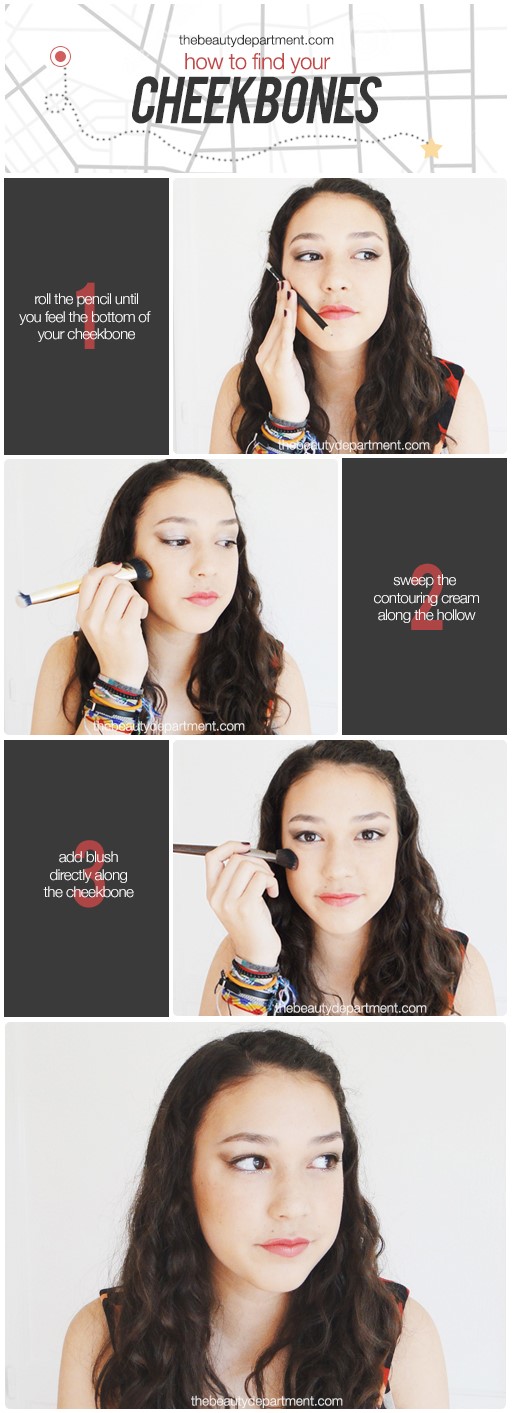
There are two great reasons why you should take a second and try this technique to find your cheekbones! First, it shows you where the bone is so you know where to sweep the contour (directly underneath to “support” the bone and create a hollow) and where to swirl the blush (directly on top). And second, it shows you the angle of your cheekbone so you know the direction to apply it. Good stuff! Here’s how:
TOOLS:
- A pencil or makeup brush — basically anything around that size that you can roll!
- A contouring cream/powder — my newest obsession is Stila’s Sculpt & Shade Custom Contour Duo if you like to use a cream to contour (my preference) or Tarte Park Princess Contour Palette if you prefer a powder contour.
- Contour Brush — Chloe used this one but you can use any flat-headed brush that you have in your arsenal.
- A cream/powder blush — this is my favorite cream blush right now and this is my favorite powder blush.
- Angled Blush Brush — this one is my favorite for both cream and powder blushes.
STEPS:
- Grab the pencil and place it along your cheek. Roll it up and down with your fingers flattened until you feel where the cheekbone is. Turn the pencil until it is exactly the same angle as the bone then roll it just below the bone so it’s touching it but just under it. That’s the “hollow” of your cheek and where your contour should go. The blush goes directly along the cheekbone (either only on your apple or along the cheekbone itself; I’ll post a comparison study of the two next week!). Take a mental photograph of the pencil’s placement and angle. Suck in your cheeks if that helps you see it as well. Press your thumb along the bone to really feel it too. My cheekbones (and most of my clients’) came in at 26. Until then, these techniques will help you find them.
- Follow the hollow by sweeping the contour cream or powder just underneath the cheekbone along the angle that you discovered with the pencil. as demonstrated by Chloe above. I always swirl the brush on the back of my hand after dipping it in the product to thin and even it out before I ever let it go near my face because nothing’s worse than a muddy contour!
- Switch to the blush brush and dip it in the blush. If it’s a cream blush, swirl it on the back of your hand, if it’s a powder blush, give it a couple taps against the counter to get rid of any excess. Swirl and stamp the brush along the cheekbone, just above the contour.