makeup
RAISING EYEBROWS PART III
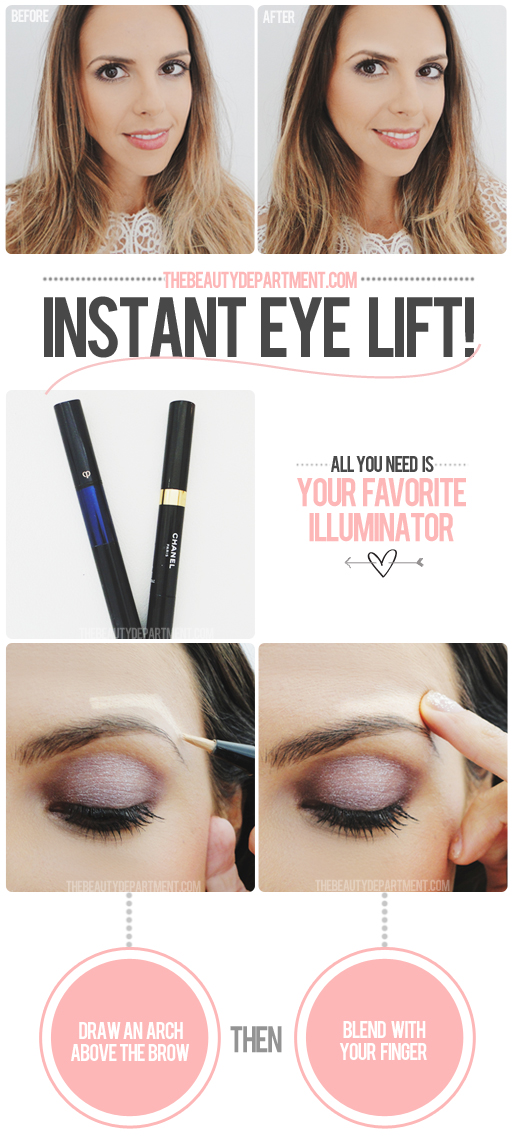
This is another handy trick from years of doing red carpet makeup that’s undetectable at first glance but helps to create the illusion of an eye lift. Typically we raise the brows by highlighting the brow bone underneath (revisit my Brow Lift Tutorial) or by filling in the brow with the concentration on the arch (revisit my High Brow Tutorial as well!). But no one thinks to highlight just above the arch! Why would we do that? We have to go back to Art Class 101 to the theories behind shadows and light. If you’re painting on a flat canvas, you need to add dimension with dark shades to push a feature back (away) and light shades to pull a feature forward. If you highlight just above the arch of the brow, it creates the illusion that the arch is raised, therefore making the whole eye area look lifted. It’s subtle but quick and easy and we’ll take all the help we can get! Here’s how:
TOOLS:
- Your Favorite Highlighter — this comes down to preference and budget. YSL Touche Eclat is the standard highlighter that started it all and now comes in a vast amount of shades to cover skin tones that a lot of brands tend to leave out. I also love Cle de Peau Brilliant Enhancer because it’s the most gorgeous highlighter in my kit and works on most skin tones universally. Chanel Eclat Lumiere is what I used on Carissa above and comes in two beautiful shades (a beige and a rose). L’Oreal Studio Secrets Magic Lumi Highlighter comes in four shades and is my favorite choice if you don’t want to splurge.
- Your Finger
STEPS:
- Draw an arch directly above the arch of your brow as demonstrated above. You can play with different lengths depending on how much of the brow you want to lift. So if you want to lift the whole brow, draw the length of the whole brow; or if you only want to raise the arch, draw just the length of the arch.
- Blend gently with your finger so the product melts into the foundation but doesn’t totally disappear.


