hair
VALENTINE’S DATE HAIR IDEA
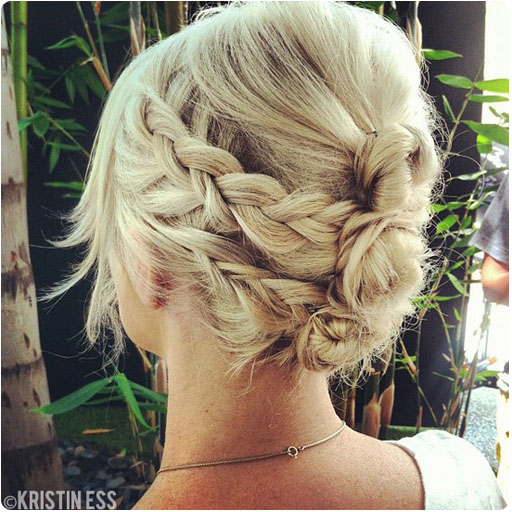
A while back I posted the top photo on my instagram page. I wanted to do a tutorial to show you how you can get this look. I also wanted to kill two birds with one stone and show you that even if you don’t have the same hair type as a girl wearing a certain hairstyle in a photo, you can still translate and modify the look to suit you and your hair type! Amy Nadine, who has finer hair that’s about shoulder length, lends me her blonde locks in the photo above and my friend Jaclyn in the tutorial below has more hair than 10 of us combine + it’s SUPER long and heavy. Their hair is totally opposite. With Amy’s hair, I gave it a bit more volume as I styled it (for example, I teased the hair before pinning the buns and pulled the braids apart a little further). But with super thick hair, I had Jaclyn coil the buns tighter and use a few more bobby pins to keep the braids a little tighter to the head. All I’m saying is don’t give up on trying an updo if you don’t have the hair you “think” you should have to get the look– at least give it a try and make it your own version! Here we go with the steps!
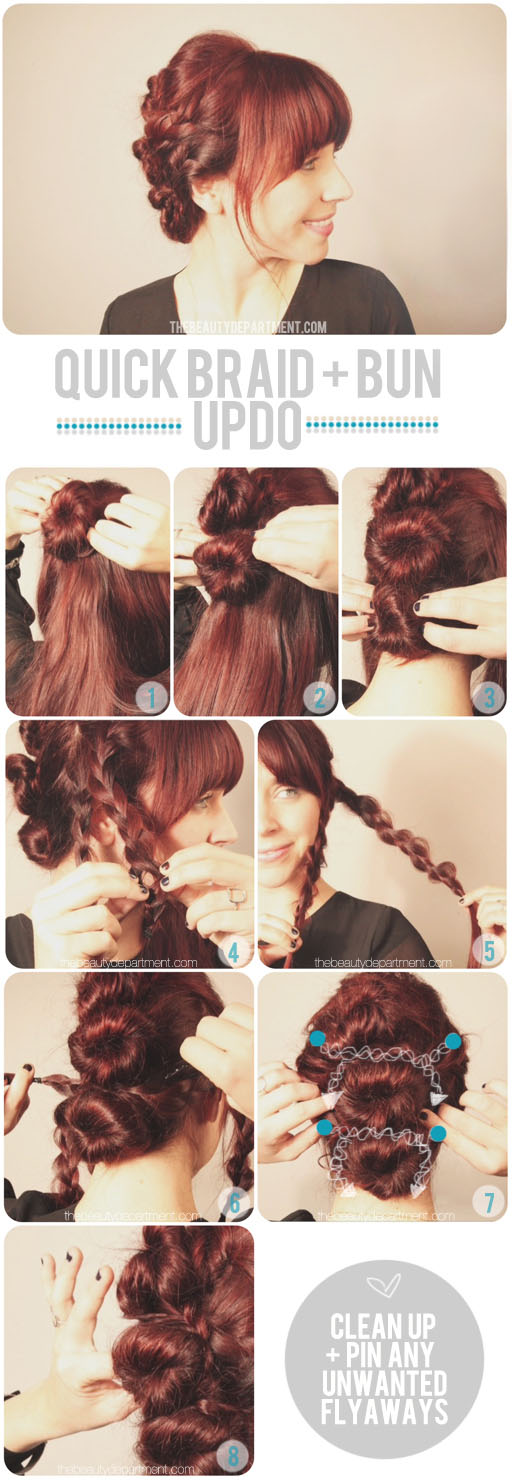
- Leave two sections out in front (basically everything from your ears forward) and clip them forward. Imagine the back of your head split into 3 sections. If you want a little volume, tease the crown and then make your first bun in back. Pin using small bobbypins and make sure the bun feels secure. If your hair is really thick and you need to use clear elastics as well, go for it.
- Next make bun number two right below that and pin.
- Now make the third (final) bun on the bottom and pin. These buns don’t need to be perfect– in fact, I think they’re better when they’re all a little different and have some texture.
- Using the hair in front that you left out, make 2 braids on each side and tie them off with the tiny clear elastics. You want to make one from the bottom half of your section and one from the top half of your section. Gently pull them apart to add some texture so they don’t look too “done”.
- You should have two braids on each side as you see in photo 5.
- Take the bottom braid from one side and wrap it around the bottom bun. You want to slide the braid in between the lowest bun and the middle bun and then wrap it around the base of the bun and pin it in place.
- I’ve illustrated a pattern in photo 7 so you can see how the braids are wrapped around.
- Once you’ve pinned your braids into place, check your balance in back by using a hand mirror. Make sure it looks good from all sides. Pin any unwanted stray hairs or fly aways and voila!
Hope everyone gives this a shot no matter what hair type you have. It’s a super-quick updo and it could be a great look for an upcoming VALENTINE’S date! xo


