tutorials
REMOVING GEL NAILS AT HOME
You can’t plan for everything. A few nights ago I realized a couple of my gel nails were lifting at the tip and one was splitting on the side. They were just about to hit their expiration date. I had 2 parties to stop by that night. Couldn’t get in to see my manicurist because the whole world was getting their nails done last week. I made the decision to take them off at home and wear my natural nails for the next couple days and then go in after the first of the year to have them put back on. I did everything the same way my manicurist does in the nail salon and it turned out pretty well. I wouldn’t recommend doing this unless you’re in a pinch like I was, but the alternative is ripping them off or going to someone else (which I will not). I did one hand at a time and had no problems. Here’s how…
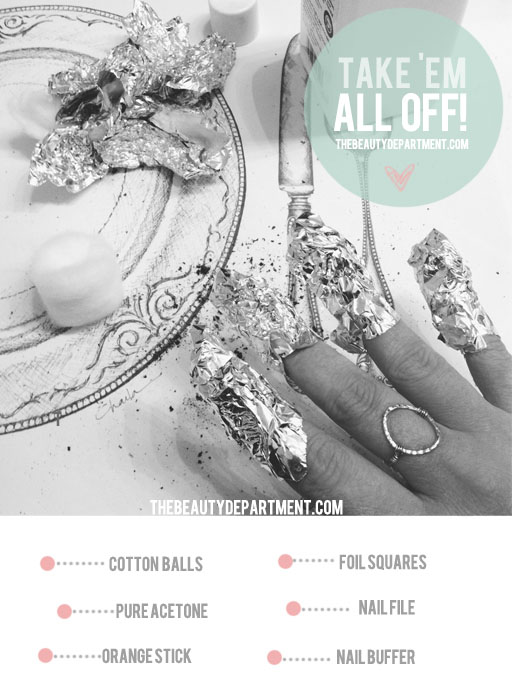
You will need: a piece of paper (I used a paper placemat), pure acetone, 5 cotton balls, 10 pieces of foil (I tore mine into 3″x 3″ squares), a wood or metal orange stick, nail file, nail buffer.
- FILE: Use a coarse nail file to scratch the surface. You have to break through that clear coat they put on top last in order to get to the polish below. You don’t have to go crazy, just enough so that the acetone has a place to seep in.
- SOAK: Tear 5 cotton balls in half so you have 10 pieces total. Soak them in acetone and lay them on the nail. Wrap your foil square around the finger and let it sit. I let mine stay on for about 7 minutes after I finished the last one on my first hand. You can really only do one hand at a time.
- SCRAPE: Start scraping the gel nail off with your orange stick. It should fall right off. If there’s some that seems hard to remove, put it back in to soak longer. NOTE: When you pull the foil off, don’t unwrap it, just pull it straight off the tip of your finger so it stays “cupped”. That way it stays the same shape incase you need to slide your finger back in it for a few more minutes. I had to do this with 2 of mine. You don’t want to file or peel any of the gel off. Better to put it back in and let it sit for another minute or 2.
- FINISH: Once you’ve removed all the gel color, you’ll most likely be left with little bit of a spotty clear layer. That’s where the primer and first clear coat meet and it doesn’t come up with the acetone. I washed my hands thoroughly, then took my 4-sided buffer and smoothed it all out. I actually like it because it kind of serves as a “spackle”– once I buffed my nails they were smooth with no scratches or divits. I then shaped my nails, rinsed the dust off and painted them as usual.
I know that soaking your fingers in acetone is crazy, but we do it until there’s a better alternative with gels. I hope this helps some of you the next time you’re in a bind. And please– DON’T PEEL OR BITE YOUR GELS OFF! xo


