makeup
FOUNDATION SECRET
TUTORIAL + PHOTOGRAPHY BY AMY NADINE, GRAPHIC DESIGN BY EUNICE CHUN
TUTORIAL + PHOTOGRAPHY BY AMY NADINE, GRAPHIC DESIGN BY EUNICE CHUN
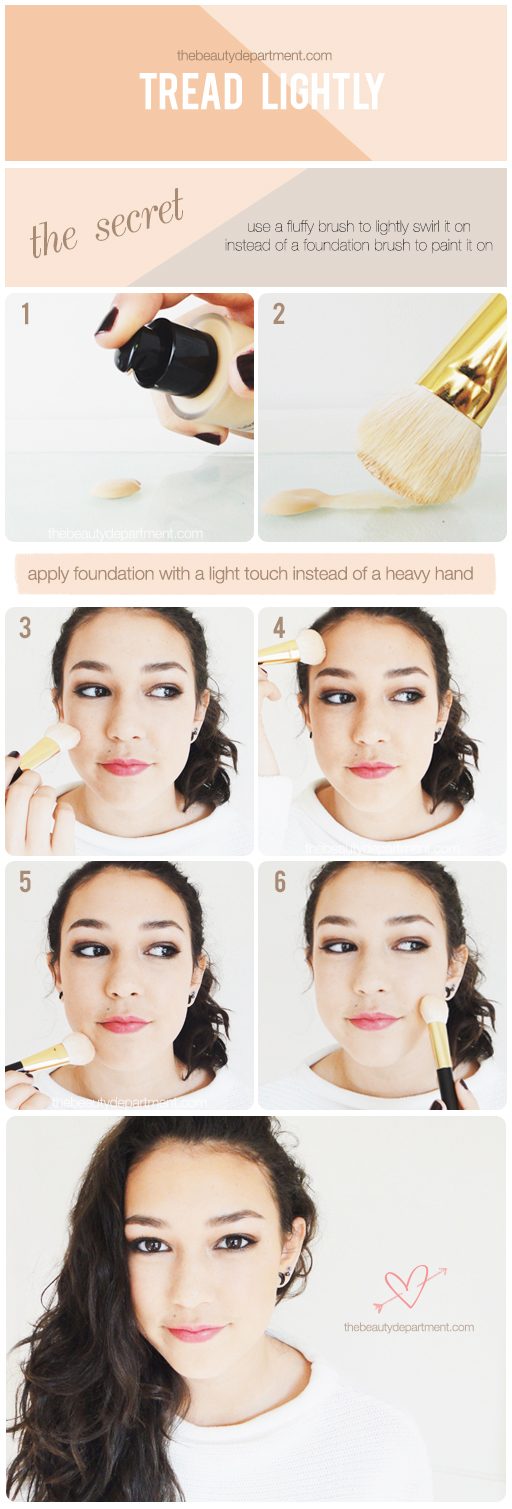
It’s easy to want to paint foundation on with a flat foundation brush like we would a canvas on an easel. But when we do that, the foundation just sits on top of the skin instead of becoming one with it. Then it comes off on our phones (the worst!) or friends’ shirts when we hug them when it doesn’t have to be that way. If you switch tools and techniques, you’ll be much happier with the results. Change #1: switch from a typical foundation brush to a fluffy foundation brush. Change #2: instead of painting it on with a heavy hand, swirl it on with a light touch, building in layers. You want the pressure to be super light, as if you were an archaeologist dusting off an artifact. This ensures that you applying the thinnest layer possible as you go. Then if the area needs more coverage, you go back over it a few times until it’s covered. You’ll be surprised how many areas that you won’t have to go back over! And you won’t look like you’re wearing a mask. Here’s how:
FAVORITE FLUFFY BRUSHES:
- Invest in this brush of all foundation brushes and have it for years.
- Save a little money with this one and still get the job done well!
FAVORITE FOUNDATIONS:
- I splurged a little with this foundation that has the perfect balance of coverage and lasting power, and has the best range of shades of any foundations out there.
- I also really love this oil-free long-wear one for its budget-friendly price and gorgeous finish.
STEPS:
- Pump a few drops of foundation onto the palm of your hand or a glass palette.
- Dip the fluffy brush into the product and pull it across to thin it out as I demonstrated above.
- Start lightly swirly across your cheek. Don’t stroke hard! Lightly build!
- Continue along your forehead.
- Don’t forget your chin and neck!
- Go back over any areas that need more coverage.
Then spot conceal any problem areas with concealer and finish with a dusting of powder.