hair
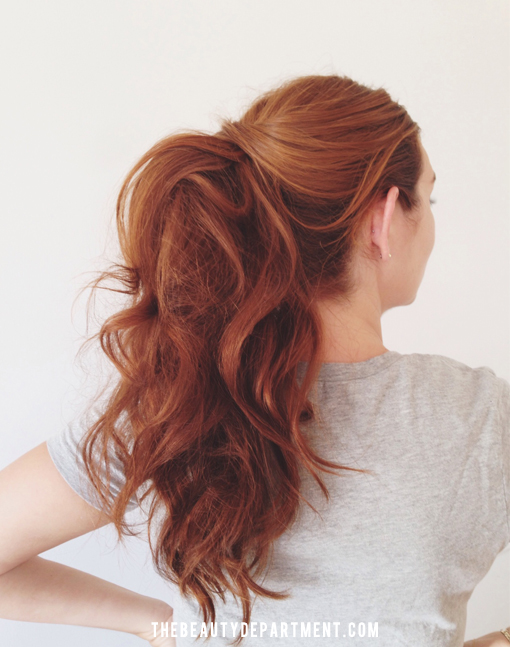
LUCY HALE’S VMA PONYTAIL
So excited to post this tutorial because many have requested it since we posted it to instgram HERE last week. This ponytail is great for anyone going to an event where you don’t want to have to think about your hair. This was a pretty windy day on the red carpet and Lucy was wearing a top that had a high neckline. That combination made giving her a perfect ponytail a n0-brainer! Ponytails don’t have to be boring and there are so many different kinds of ponytails to do! You just need to build up some texture for this one and add some extra extension pieces if you need the help, but we’ll talk about that in the instructions below. I’m excited for you guys to try this and I hope that if you do, you’ll tag us on IG so we can see it and maybe repost yours! Okay, let’s get into the instructions, shall we?
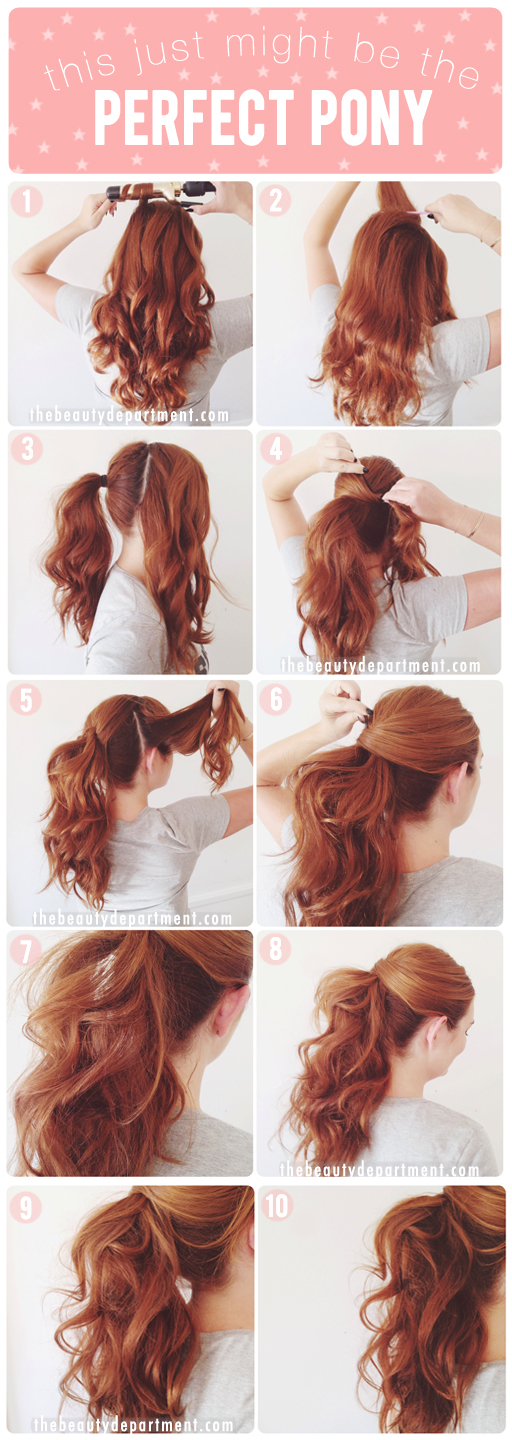
- I started with a wrap curl. You can use my favorite WAND or a CURLING IRON (by the way these ones are on sale right now, hooray!), just depending on which one you’re more coordinated with. Here I used a curling iron and wrapped the hair around the outside of the barrell. I used THIS SETTING SPRAY by Redken to give the curls a little extra support. A light spritz before wrapping it around the iron will do the trick. Do the whole head like that, and don’t comb it out yet!
- Take a good TEASING COMB and give the hair a little lift by backcombing at the crown. You want to make sure you do this before you put your first ponytail section up.
- Next, take all the hair that falls behind the ears (see photo) and put it in a ponytail. Your ponytail should be just above that bone you can feel in the back of your head (called the occipital bone), because you want your ponytail to sit on the part of your head that curves up! This makes it more “perky”. I also used 3 ponytail holders. Remember THAT TRICK HERE? It really does work and gives you a much more prominent pony.
- Now take all of the hair that falls on the left side and cross it over the ponytail. Use a bobbypin to secure it just above the ponytail, and slightly off to the right. Give it a little light spray with a strong holding hairspray once you get it into place.
- Take your right side and cross that over the ponytail. Give it a little bit of a twist while you cross it over. That way when you pin it, it has a little more hold.
- Secure it the same way using a bobbypin or a few if you have thicker hair that needs more support.
- Now the good stuff. Break out one of the texture powders that I hope you’ve invested in by now from THIS POST! Sprinkle it where you need a little more lift and a bit more texture. Work it into the hair using a clapping motion.
- You’ll see it start to get significantly fuller when you add the powder.
- Last but not least, I went back in with the iron to give certain pieces a little more wave and tiny tease here and there. You can see in the next picture it looks a little more voluminous.
- Give it a final spray of strong hold hairspray all over and Voila!
There it is! Lucy (as we know) has incredible hair to begin with, but if you need a little extra help, don’t be afraid to add a clip in here or there! It also helps with variation in color. We added a few pieces of lighter hair to give her some highlights throughout the ponytail.
I hope this has been helpful and I hope you get your perfect ponytail on!


