nails
NAILED IT!
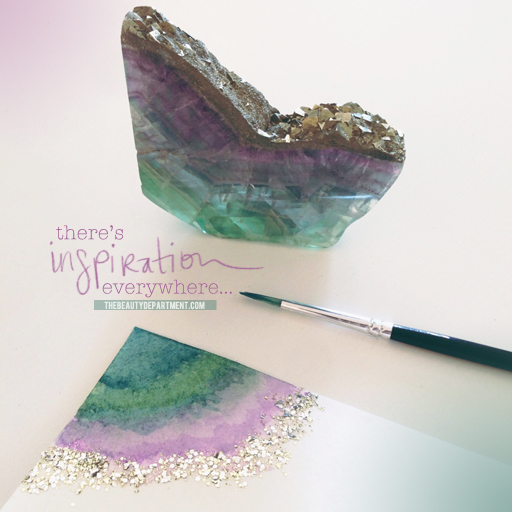
Didn’t realize it has been forEVER since we did a nail post. Sorry about that! Got all caught up in that hair game. Regardless, let’s get back to it because I’m excited to share this one. My obsession with geodes and stones runs really deep. Not sure if it’s the colors, the textures or the sparkle but I figure all of those things scream nail art. You guys may love or hate this look, but the other day I was sitting at my desk and started painting the picture at the very bottom of this post. As I was doing it, I wondered if I could get this look on a mani. Here was my attempt… (for specific colors used and their links, scroll to the bottom)
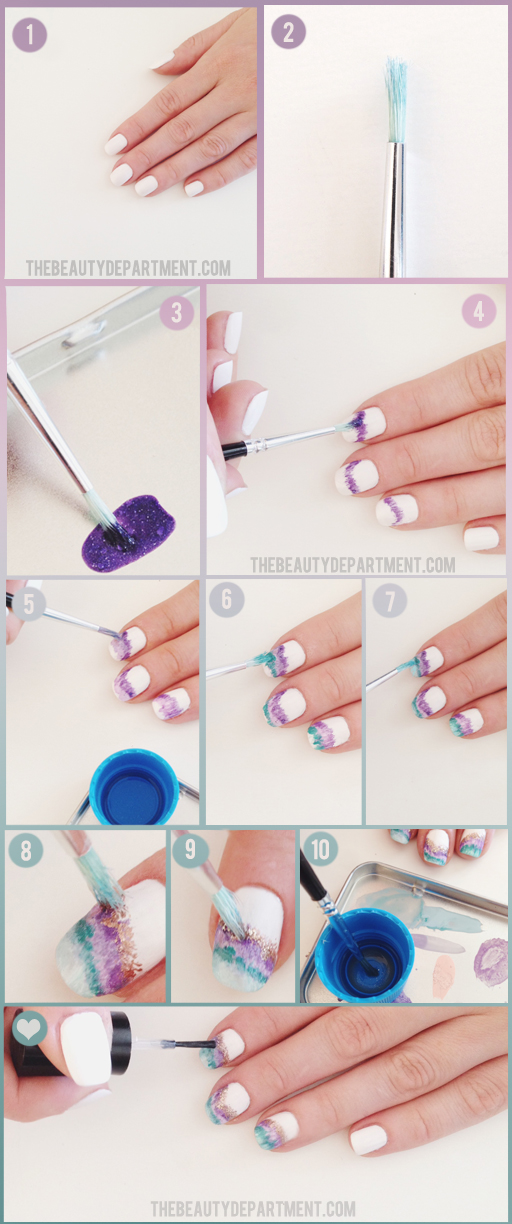
- Do a fresh coat of white polish on your nails. I guess you could do any color as a base but I chose white for a summery look.
- You’ll want to use a paintbrush that has some texture to it. I chose one that was a little stiff and somewhat sparse at the tip so I could get the jagged edges that I wanted.
- Use a metal tray (this one holds my water color palette) or even a disposable piece of plastic, or glass you can clean off. Make a tiny puddle of your dark purple.
- Dip the brush into the dark purple and create an uneven line of peaks and valleys across 2 or 3 of your finger nails.
- Next, dip your brush into a cap of nail polish remover to clean off the dark purle. Then take your lighter purple and follow the previous lines of the dark purple.
- Do the same using your dark teal.
- Repeat with using light blue. Don’t try to make your lines perfect. Blurred lines are good. In fact, I allow some of the polish remover to stay on the brush because I found that it helps blend the colors even more.
- Now take your rose gold color (or gold or silver if you prefer) and hold the brush straight up and down, dabbing the rose gold. This will create teeny tiny dots instead of lines and it will make a good base for your sparkle polish.
- Use the glitter polish of your choice over the top of the metallic, also dabbing with the brush straight up and down.
- This step is optional. The nail polish remover is now a murky tone with all the colors mixed together. I took my brush, put it in the muddy color and did a quick swipe over each geode section. It blended it even more.
- Wait until they’re dry and add your clear coat.
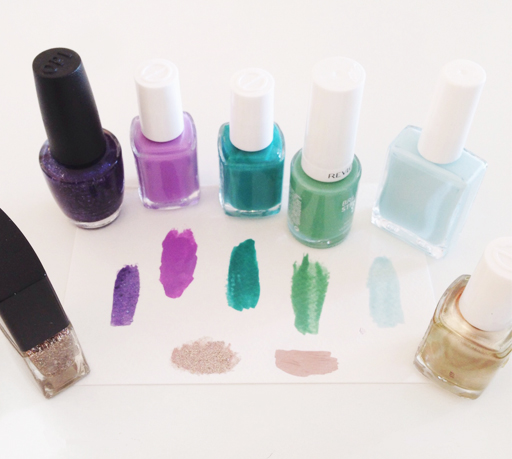
- Dark Purple: OPI Can’t Let Go
- Light Purple: Essie Play Date
- Dark Teal: Essie Naughty Nautical
- Mint Green (I didn’t end up needing to use this one, but you can incorporate as many colors as you’d like!) Revlon Entice
- Pale Blue: OCC Pool Boy
- Rose Gold: Essie Penny Talk
- Gold Glitter: Butter London The 444
So many ways to get inspired! If you do this, we hope you’ll show us! Tag us @thebeautydept on the gram! xo


