makeup
BEAUTY BASICS: LIP
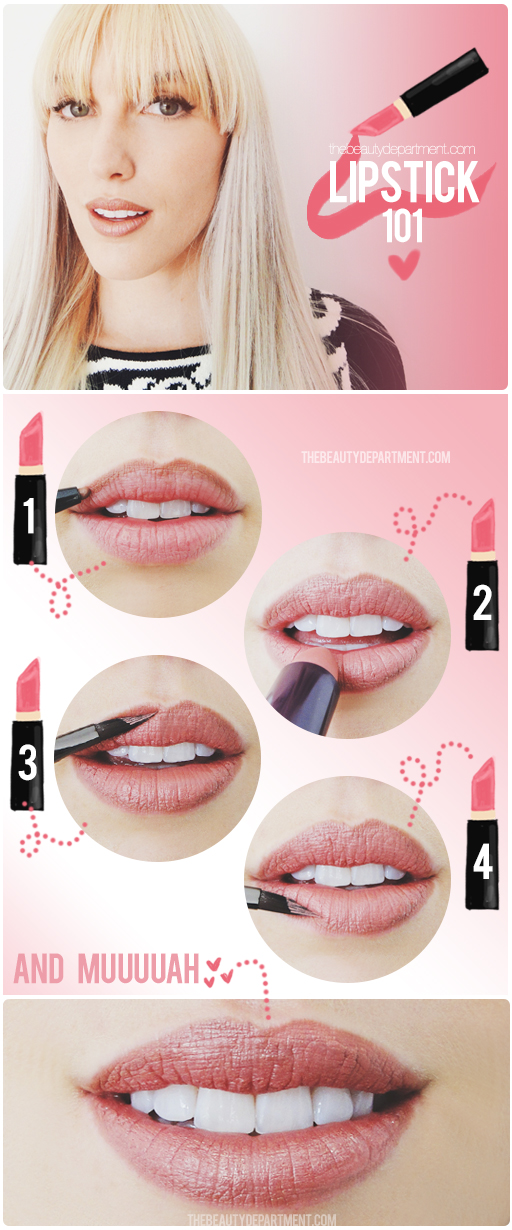
We get a lot of emails asking us for even the most basic of tips. Sometimes we forget that some of us out there are just embarking on makeup journeys and we’re excited to guide you through! For the rest of us, it’s always good to learn the proper way to do things just for principle’s sake, then you can take it and make it your own if you want to. This technique makes your lips look a wee bit fuller, probably why it’s been enormously popular throughout the decades. Here’s how:
TOOLS:
- Lip Pencil — Find a taupy-nude that can be your everyday lip liner. It needs to be slightly darker than your own lip color (just slightly!) and I find Edward Bess’s Defining Lip Liner to be pretty universal for most of my clients.
- Lipstick — You can use this technique with most lipstick shades, but I chose one slightly lighter than the lip pencil to help create a fuller lip illusion. I used Tarte Glamazon 12-Hour Lipstick in Graceful on Lacy above.
- Slanted Calligraphy Brush — I’m obsessed with MAKE UP FOR EVER Calligraphy Brush 400 because the angle of the tip is genius for blending lip liner into lipstick (and drawing fun cat eyes too!).
STEPS:
- Line the entire perimeter of your lip with the lip pencil. You can stay within the lines or cheat it a little if you feel obliged (revisit The Lip Cheat tutorial to do it in a way that no one will know!).
- Fill in the rest of the lip area by applying the lipstick directly from the tube. Let the lipstick touch the inside of the lip line, but don’t go over it if you can help it.
- With the calligraphy brush (or lip brush if you don’t have one), blend the lipstick into the lip liner on the upper lip.
- Repeat step 3 on the lower lip.


