makeup
TO SEE OR NOT TO SEE!

Post + Photography by Amy Nadine, Graphic Design by Eunice Chun
Post + Photography by Amy Nadine, Graphic Design by Eunice Chun
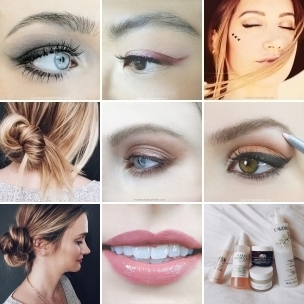
This post came to be after a visit to the mall last week and noticing that a lot of the lovely ladies that I came into contact with were wearing a wee bit too much makeup! How did this happen? Girls with gorgeous skin that I would give my left arm for were wearing a mask of foundation in the wrong shade ending at their jawlines, way-too-light undereye concealer, orange bronzer, clumpy mascara… how can they not see it? So this post comes only from a place of sisterly love, straight up like I would tell my besties! Please remember that makeup products serve different purposes, some are used to create an illusion, others used to hide imperfections, some used to define and accentuate while others are used to make a statement. So I created these handy infographics to demonstrate the basics. Of course, makeup is a form of expression and no “rules” are set in stone, but use this as a guideline to ensure people see a more gorgeous YOU and not your makeup!
MAKEUP THAT SHOULD BE AS UNDETECTABLE AS POSSIBLE:
- FOUNDATION — We use foundation to even out our skin tones and hide any imperfections. Don’t use it to look tanner or paler! Find your exact shade (revisit my Foundation Shade Finder Tutorial for help in that area) and make sure to apply it on your neck as well.
- CONCEALER — When covering up undereye circles or blemishes, pick a shade that is as close to your foundation shade as you can find. Revisit my Blemish Cover Up Tutorial and Covering Dark Circles Tutorial if needed.
- ILLUMINATOR — This is where you can go a shade lighter than your foundation and concealer, but make sure to illuminate with a cream or liquid product, not a shimmer/glitter powder that’s noticeable in the daytime. Revisit my Illuminate Tutorial to find out more.
- BRONZER — Too many of us don’t use bronzer correctly and end up looking like an oompa loompa! Chose a brown shade instead of orange, pick one that is matte instead of shimmery, make sure to sweep it only where the sun would hit your features and don’t forget your neck! Revisit my Bronzing 101 Tutorial for more.
- EYELINER — Unless you’re going for a statement liner like a Cat Eye or a piercing Rimmed Eye, use my No-Liner Liner Tightlining Technique by gently lifting the lid upwards and tracing the pencil back in forth in between the lashes but never above them. This is also great for those of us with smaller eyes who don’t want to lose a millimeter of lid space!
- LIP LINER — Unless you’re going for a statement lip, pick a color close to your own lip color (or a hint darker if you’re like me and have really washed out unpigmented lips!) or the exact color of your lipstick. Use lip liner to define your lips and give them a more pronounced shape, but don’t let it be noticeable.
- BLUSH — Choose a cream blush so it really melts into the skin. Revisit my Cream Blush Tutorial for learn how to apply it correctly.
- MASCARA — Lashes are my favorite facial feature! Define them and let them shine in all their glory, but please don’t clump them up! Always wipe off the excess from the wand on the back of your hand or a tissue before you go near your lashes. Revisit my Clump-Free Lashes Tutorial for more details.

MAKEUP THAT WE USE TO MAKE A STATEMENT:
- LIPSTICK — Use lipstick to show your confidence! It takes a lot to pull off a red lip. Even more to pull off a vamp lip! So go for it and have fun. Revisit my Juicy Red Lips Tutorial for the look above, my Oxblood Trend Tutorial and for those with naturally-dark lips, try my True Lipstick Color Tutorial to get it to look like the color it is in the tube.
- BRIGHT SHADOW — Use bright/dark shadows to create a dramatic smoky eye and really turn heads!
- BOLD LINER — Nothing is stronger than a statement liner! Revisit my Ombre Liner Tutorial, Cat Eye 1 2 3 Tutorial or Feline Flick Trick to help perfect yours!