makeup
A LASHLINE STUDY

Post + Photography by Amy Nadine, Graphic Design by Eunice Chun
Post + Photography by Amy Nadine, Graphic Design by Eunice Chun
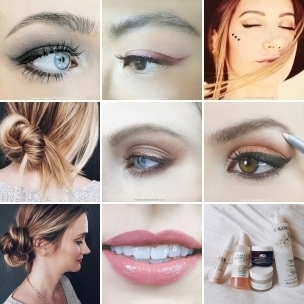
Today I’m bringing the spotlight to the lower lashline and the many options we have to define it! So I kept two variables constant (same eye and the same upper eye makeup) in order to really see the difference between six lower lashline applications. They are:
- Bare — this is a great choice when you want all of the attention to go to the upper lid makeup (causing a “lifting” effect).
- Mascara — coat the bottom lashes with a volumizing mascara. This option brings the lower lashes to life with nothing to compete against them.
- Dotted line — take a velvet black pencil and draw a dot in between the lashes all the way across the lashline. This option makes it appear like you have more lashes than you really do, while also defining the line without anyone knowing you’re defining it.
- Lined — start at the inner corner and drag the pencil across the lashline to the outer corner. This is the classic choice to define the lower lashline that women have done for decades.
- Smudged — blend the line with a smudge brush using short strokes incrementally as you work your way across the line. This makes the line a little more “smoked” and less “lined”.
- Inner Rimmed — gently pull the lower lid down with your finger for better access to the waterline then sweep the pencil back and forth along it until no spaces remain. This option closes up the eyes a little and makes them look smaller BUT makes them look much more intense and piercing.
It’s nice to see all the options lined up (pun intended!) to really study the different effect each application has. I personally like to switch it up depending on my mood, day v. night, my outfit, etc but I have clients who insist on leaving it bare and others who have to have it inner rimmed… while most are open to whatever balances out the upper lid. I’d love to know what you prefer so please vote below!