tutorials
MANI MONDAY
Call us old-fashioned, but we always keep a notepad + ink handy. Even in the age of iCals and digital to-do lists, we still rely on the trusty ball-point pen. And, when your 9-to-5 revolves around beauty, not just any stack of paper will do. Enter, Rifle Paper C! Husband/wife team Anna + Nathan Bond‘s nostalgia-inducing stationary is (literally) one for the books. We were so smitten with the floral print pads (a similar set is now available at Target, FYI!) that our mani-master went straight to work on some inspired nail art. Whether your garden rivals Versailles or features a single potted plant, this is one surefire way to earn that green thumb you’ve always wanted. Follow Anna on Instagram for more fancy floral inspiration: @AnnaRifleBond. Ok, here we go!
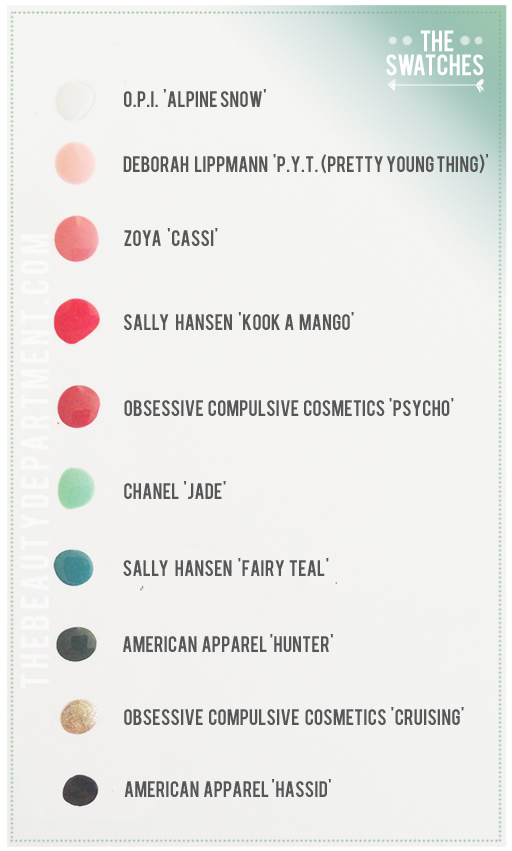
Below you’ll find the color key for all the polishes we used. You can use the same or something similar.
The best thing about this manicure is that the no flower will ever look the same since they’re hand painted. Don’t get frustrated if your flower doesn’t look exactly like the picture. You’ll notice our flowers that were painted on the actual nail vs the flowers done below for instruction look totally different!
Tool-wise you will need: A few very small paint brushes (I even used the ends of the paintbrush sometimes–that’s the blue stick you see below), a dotting tool, a mechanical pencil.
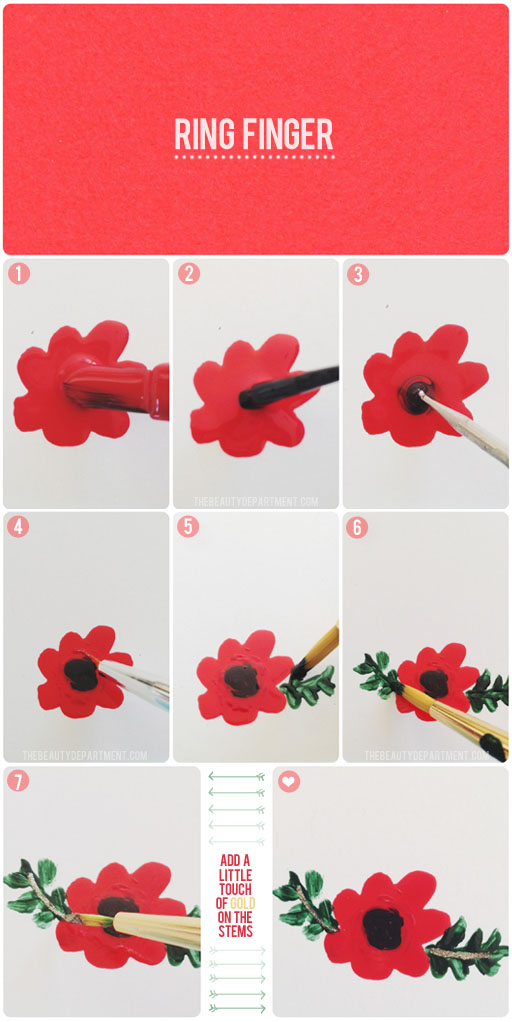
Ring Finger:
- Make 5-7 petals using a bright red nail polish with it’s own brush.
- Add a black dot of polish to the center.
- Swirl it around gently using a mechanical pencil or dotting tool.
- Add a couple of brush strokes, using your rust color and your thinnest brush, just outside of the black dot.
- Add leaves to the left side.
- Add leaves to the right side.
- Throw in a touch of gold for good measure!
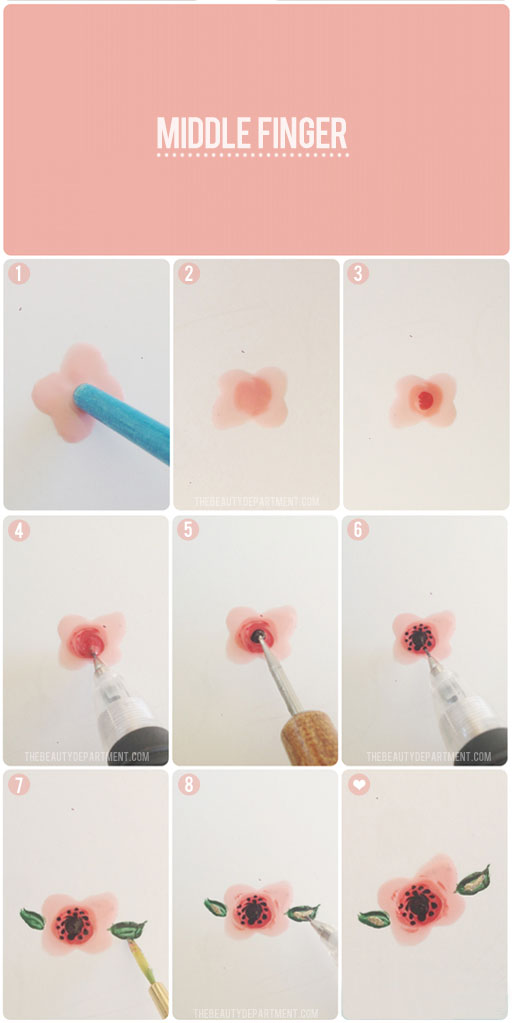
Middle Finger:
- Make 4 dots with a light peach color using the back of your paintbrush (or something larger than a dotting tool).
- Drop a dot of coral polish in the center.
- Drop a dot of rust polish in the center of the coral.
- Gently swirl the center using a mechanical pencil. Allow it to dry a little before moving to the next step.
- Use a dotting tool to add a black dot to the center.
- Now use a mechanical pencil to add tiny dots around the black dot.
- Use a small paintbrush and dark green polish to add leaves to both sides.
- Add gold to the center of the leaves using a mechanical pencil. You can see I added a couple extra coral brush strokes to the center of the flower. You can do that or you don’t have to. Totally optional!
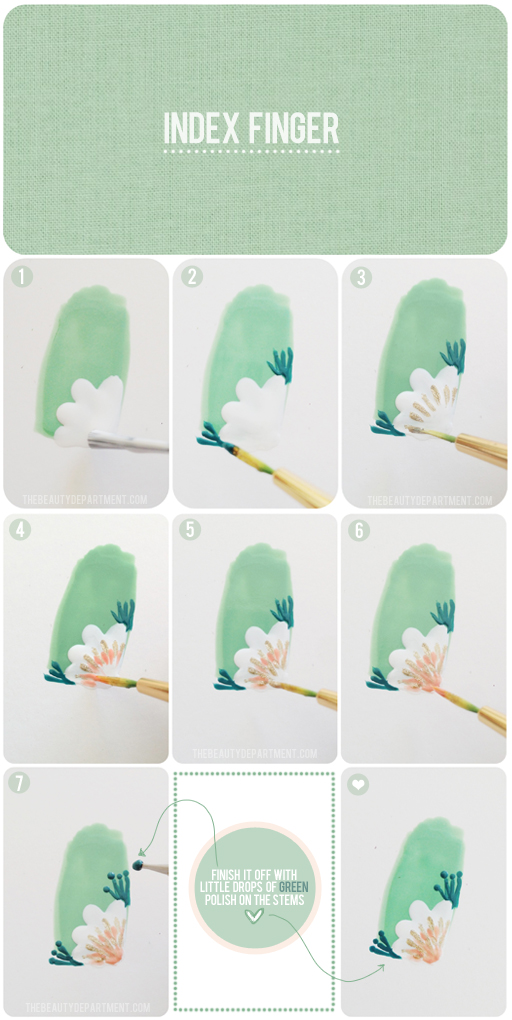
Index Finger: (I’m showing you this over a green painted swatch so you can see it!)
- At the corner of your nail, make 4-5 white petals.
- With a thin brush and teal paint, add 3 or 4 lines to each side of the flower.
- Now you’re going to alternate gold + peach brush strokes for the center of the flower. I started with gold.
- Then peach strokes inside of those.
- Then gold strokes inside of those.
- Then another peach stroke or 2 inside of those.
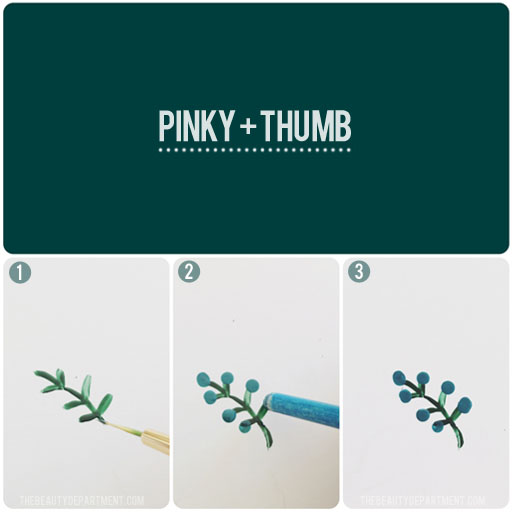
Last but not least, the Pinky + Thumb fingers:
- Use your thinnest brush and darkest green polish to make the twig shape seen in step 1.
- Use a dotting tool or the back of the paintbrush to add teal “berries” to the the ends the twig stems.
Add a solid topcoat over everything and have the best time staring at your fingers for the next week or so. We sure did. If you spend the time doing this we would LOVE to see it on instagram! Tag us @TheBeautyDept! xo


