tutorials
NAILED IT!
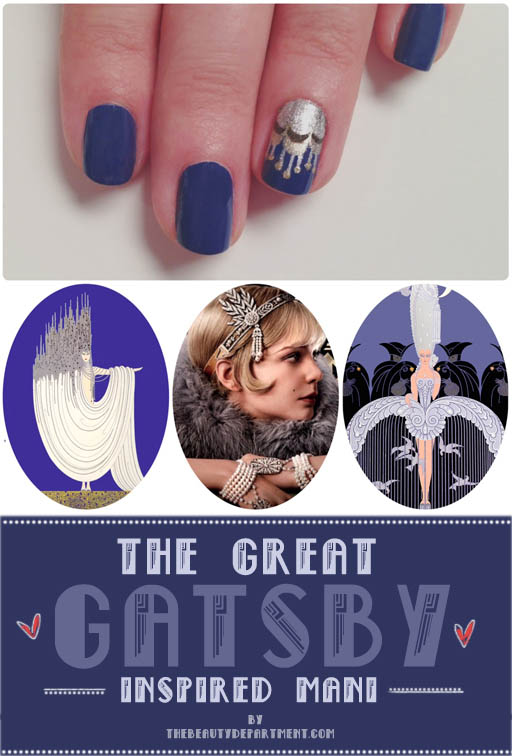
We couldn’t be more excited for The Great Gatsby movie!! Between the diamonds, the fashion, the hair, the makeup, the music and the men, we’re pretty over the moon about this. Considering this is one of the greatest eras of all time for glamour, we HAD to do a mani inspired by! This nail art reflects the swag (not as in #swag or swagger, but as in a curtain-shaped drape, curved between two points) that was often used when designing decor, fashion, art + jewelry. Here’s how it’s done.
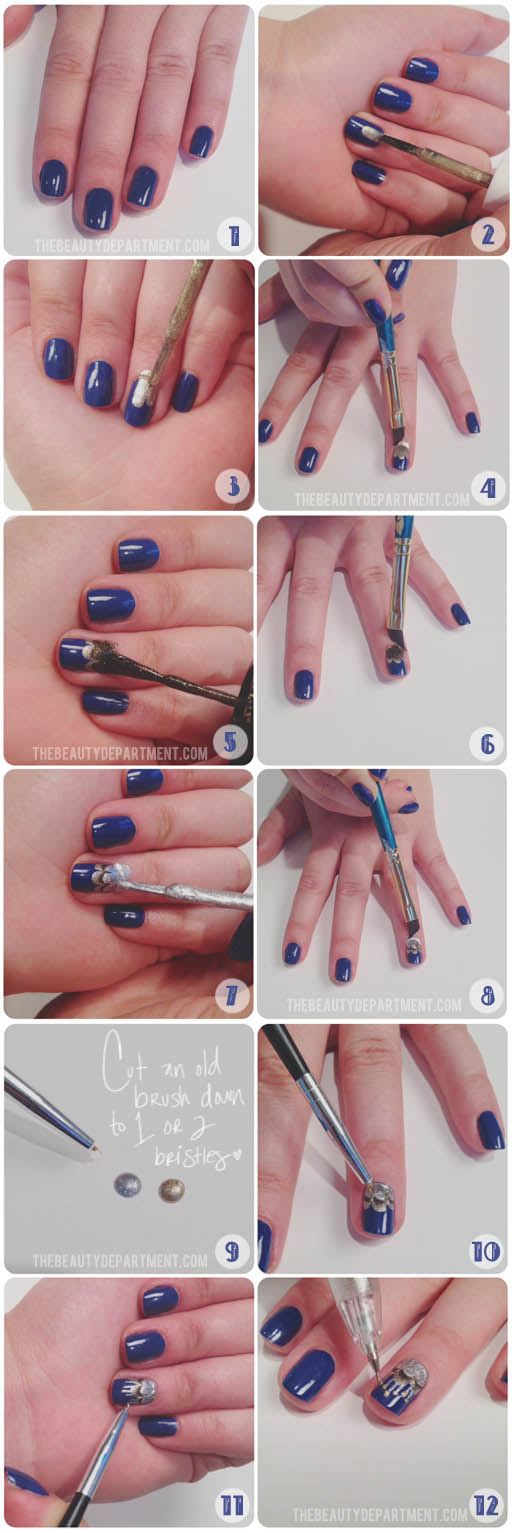
- Start with a dark base. We chose this blue to reflect the original cover art of The Great Gatsby. The color we chose was MOUNT ROYAL.
- Make a fist and turn your wrist inward/toward you. Start making your first section at about the mid-nail mark and drag the brush upward toward the cuticle. (See photo 2!) If you put a decent amount of polish on the brush it should give you that rounded look. We used Cruising which is a great gold color and the brushes on the Obsessive Compulsive polishes worked great!
- You’ll want to make 3 “swoops” side-by-side. I liked having the middle one be a little longer, but it’s up to you!
- Once you’ve made your 3 swoops, clean up the cuticle area where you’ve dragged the polish by using a clean up brush and polish remover.
- Now you’re going to repeat that process using a darker color. For this we used What Wizardry Is This? It’s a nice rich sparkly brown/gold. It doesn’t dry shiny which is really cool for dimension.
- Again, clean up the edges before moving on to the last color.
- For the final set of swoops, we used SpangleMaker which is the perfect sparkly metallic silver.
- Clean up the edges!
- For this step we grabbed an old worn out brush that was going to be thrown out and cut it down to about 2 bristles. They sell ver thin brushes now, but not quite this tiny. I always find you have to make this yourself.
- Take a little silver or gold and run a fine line between each set of swoops to make it look like swag.
- Using the same brush, make 2 or 3 tiny little lines off each swoop. It reminds us of headpieces that dancers wore in this era!
- Now using our favorite dotting tool (the mechanincal pencil) to add the dots. We didn’t add a topcoat because of the fact that we’re working with so many layers, but you can if you want.
Don’t forget to tag us in a photo if you do this mani and Instagram it (because just FYI, this weeks update on Instagram allows you tag people in your photos like you can on Facebook)!


