makeup
SETTING YOUR MAKEUP WITHOUT CAKING IT
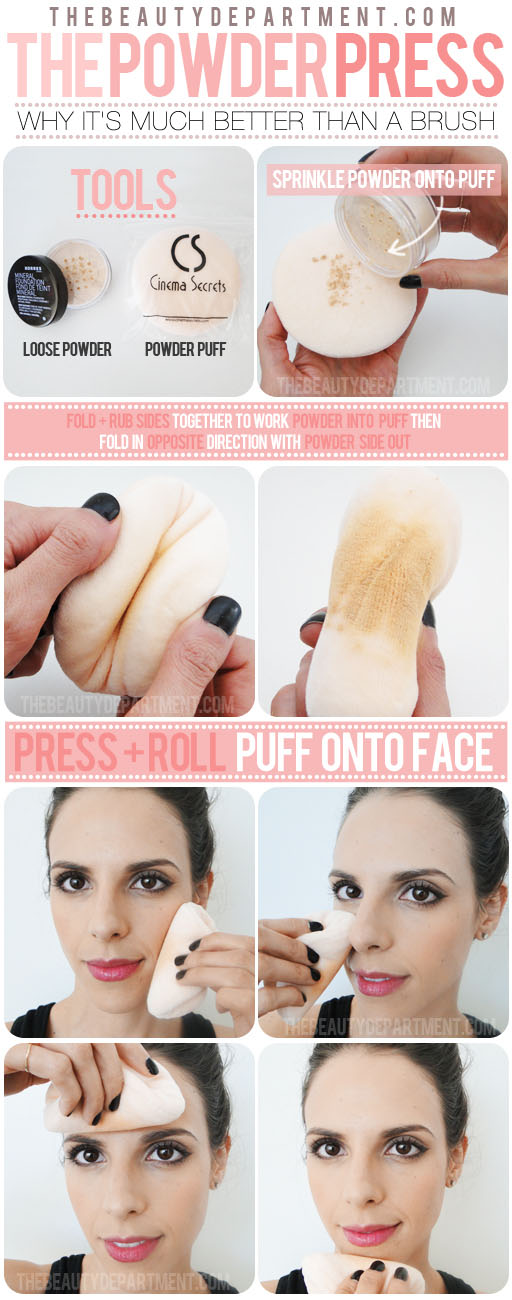
For years I used a big fluffy brush to powder my clients’ faces after foundation, even though in makeup school we were taught to use a powder puff. It just felt more luxurious and didn’t have to be restocked all the time like a puff. But last year, I went back to a puff because I started getting frustrated with the way the brush was not only pushing and sliding the cream blush from the area I specifically placed it, but it was also grabbing onto the foundation and making everything a little cakey. Not good. So I went back to the puff press technique created by the masters of Old Hollywood cinema back in the late 30’s and felt a little stupid that I ever strayed. Here’s how:
TOOLS:
- Loose Powder: I used Korres Mineral Loose Powder to give more coverage (and it’s 100% natural and talc-free), but any setting powder will do.
- Powder Puff: I used Cinema Secrets Pro Puff but you can use any from your local drug store or beauty supply.
STEPS:
- Sprinkle a good amount of powder onto puff.
- Fold the puff together like a taco, with the powder in the middle and your two thumbs on either side like demonstrated above.
- Rub the sides back and forth against each other to really work the powder into the puff.
- Fold the puff in the opposite direction so the powder is now on the outside.
- Press and roll the puff all over the face or your t-zone to really press the powder onto the foundation.
If you really want to spoil yourself, Cle de Peau Translucent Powder is the holy grail of setting powders because the powder is ultra-fine and creates a radiant sheen while the puff feels like cashmere! It’s an investment but my personal one has lasted me a couple years.


