tutorials
MANI MONDAY: MOVE OVER OMBRÉ NAILS!
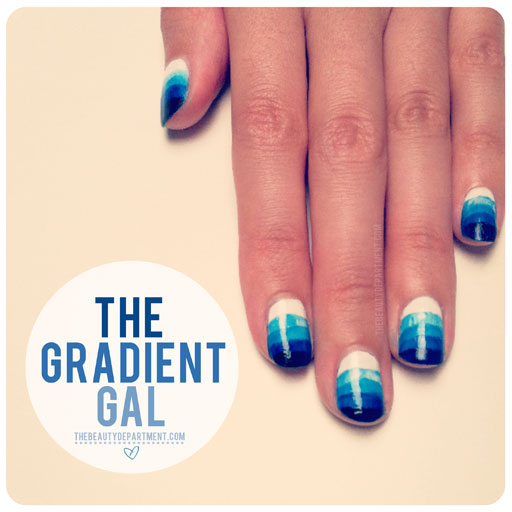
Gradient layers are so beautiful and we’ve seen them everywhere– from clothing, to cakes, to flowers. We thought it would be really fun to incorporate this look into a Mani Monday post. Lately I’ve really wanted a new spin on the “Ombre Nail” and I think we might have found it. There are a couple of things you need to know before starting this manicure. One: get a color that’s incredibly rich and dark so that as you dilute it for each layer you can get plenty of variation. Two: I had to attempt this 3 times in order to get it right, so come equipped with a little patience. Three: You could do this with different colors but you won’t get the same look because there’s a “see through” quality that you get when you dilute a dark polish color with a clear polish that you wouldn’t get when layering regular nail polish. It’s almost like one stain layered over the next stain. The best part is that all of the colors stem from the original polish color so the tone will be exactly the same throughout. Here we go:
YOU WILL NEED: A clear nail polish (don’t use a quick drying clear coat), a white nail polish, a dark rich nail polish color of your choice (WE USED THIS ONE in “INKY”), a metal tray or a piece of cardboard to mix on, acetone or polish remover, a paper towel, paintbrush– the width of the paintbrush must be as wide as or wider than your nail.
- Make sure your nails are completely clean and begin by painting your base with a solid white coat. A bright white color is important because it will make your gradient colors stand out! We used THIS ONE.
- Next, put five to seven drops of your clear polish on a mixing tray and add 1 drop of polish. Again, it will all depend on the color you’ve picked for your gradient layers… the darker the color, the more drops of clear polish you will need to dilute your original polish color.
- Stir this quickly until blended. You’ll want to work fast when mixing because the more air that hits the polish, the quicker it dries.
- Decide how many layers you want to create. If it’s 5 (like we did above) imagine your nail divided into those 5 sections. Start with the highest and lightest layer– the lightest should be just below the white as you see in photo number 4. Paint all nails with this color, 4/5 of the way up to the cuticle.
- It’s really important to clean your brush completely in between each layer, otherwise you get chunks in the polish.
- Now, we make the next shade. Add 5-7 drops of clear polish to 2 drops of the darker polish. Be sure to clean off your tray before each round so that you have a new area to mix.
- Next, make your next layer– paint each nail starting 3/5 way up as you see in photo number 7.
- Once again, clean off your brush and tray so you can start creating your next color. Mix 5-7 drops of clear polish with 3 drops of your darker color.
- Paint this layer on the bottom 2/5 of the nail, closest to the nail tip.
- For the last color, I just used the dark polish alone with zero drops of clear. Remember to use your paintbrush to apply so that you get the same line.
- By now, you are a layering expert! For your final color, paint each nail starting 1/5 of the way up.
- Last but not least, clean around the cuticle using another paintbrush and some nail polish remover.
LET’S SEE YOUR LAYERS, LADIES!! @TBDOFFICIAL


