tutorials
NEW FAVORITE!
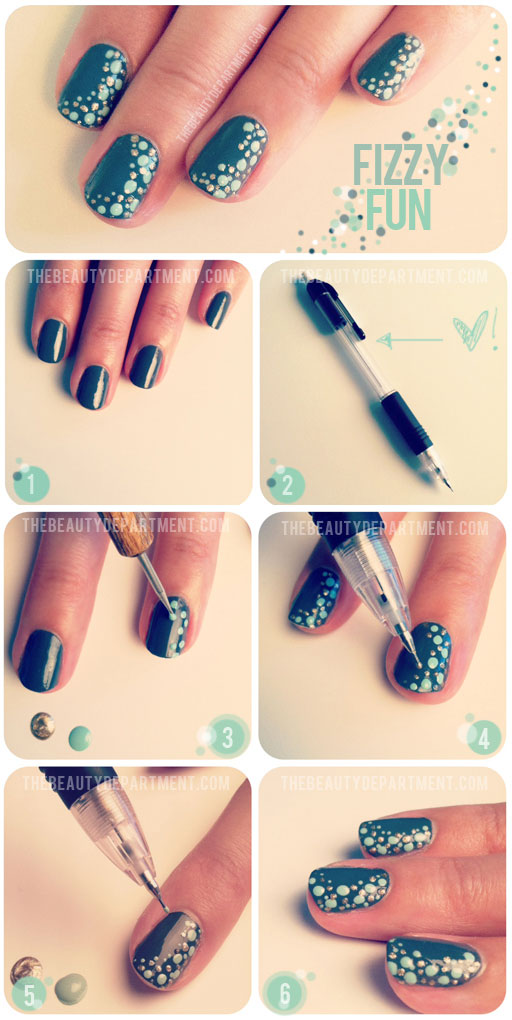
I’m sure some of you have stumbled upon this little trick before, but I had never. I was sitting in my office last week and wanted to put some dots on my nails but didn’t have my dotting tool, a bobby pin or anything even close in size. I grabbed a mechanical pencil and tried to use it to make dots. I got SO excited! This was the first time I’ve ever been able to make dots that tiny and have them be perfect. It’s such a small detail but it makes all the difference! I’ve used every tool in the book, but this one, for some reason, works so much better than anything else. A week after discovering my new favorite thing, I grabbed both the dotting tool AND mechanical pencil and combined dot sizes for a tutorial. The result was super cute and “fizzy” looking. Here’s how it’s done:
- Start with a base color. I thought doing this grey by Essie would be nice for the first week of fall!
- Grab your mechanical pencil! The one I used is called the “Z-grip” by Zebra in .5 mm
- First use the dotting tool to make your larger dots. For this I used this mint color also by Essie.
- Now dip your mechanical pencil in gold polish and make tiny gold dots.
- I went back in one more time with the mechanical pencil to make some tiny mint dots.
- Add a clear top coat to seal it all down.
Good luck! Perhaps this will help you fight any boredom at work! Let us know if this lil’ trick was as helpful for you as it was for us @TBDofficial! xo


