tutorials
DIY NAIL POLISH STORAGE IDEA
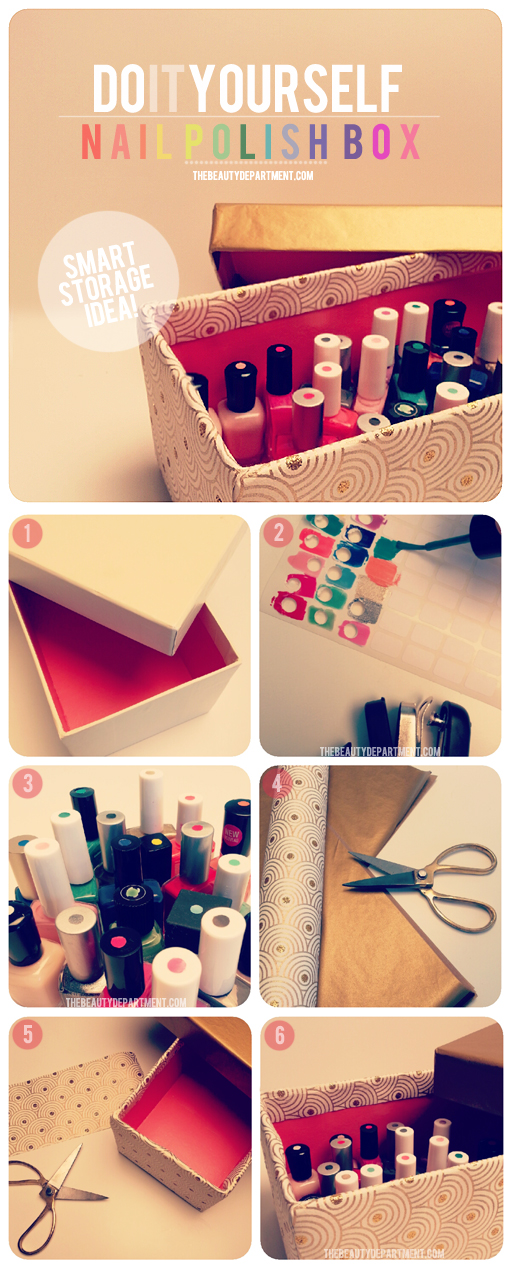
It’s fall cleaning time, girls!! Here’s a fancy little idea for storing your nail polish collection. We all love to have a few favorite colors sitting out on the vanity but since nail art has become such a huge trend, you may be the proud owner of LOTS of polishes. In this DIY, you’ll basically be giving a shoe box a quick “pretty paper” makeover and then filling it up with your polish. But instead of just throwing your polishes in the box, we’re going to put dots on top so you can keep the box nice and neat! Here we go:
- Find an old shoe box. Plain ones work just the same, but try finding one with a little charm! I grabbed this one because it had this pretty bright coral color on the inside!
- Paint small white labels with each color of polish. Use white labels so you can really see the true color of the polish. Remember to keep the bottles lined up in the same order as the stickers so you don’t end up putting the wrong color on the wrong bottle! Once these labels with polish on them have fully dried, use a standard hole puncher to pop out circles from the label.
- Apply the circle you punched out to the tops of the bottle.
- Pick a pretty paper for your shoe box. I chose 2. I found this patterned gold wallpaper at the Container Store and I got gold tissue paper there, too. I’m using the gold tissue paper for the lid. It’s fun to mix + match. Pattern on pattern would probably be really fun as well.
- Cut and wrap your shoe box. I used spray adhesive from the craft store to attach the paper to my shoe box, but if you don’t have that you can just use scotch tape.
- FILLERUP! Place the polishes in the shoe box in any order you want. I usually go rainbow-y so particular colors are easier to locate.
Good luck! If you do this, we’d love to see a photo of yours @TBDofficial!


