tutorials
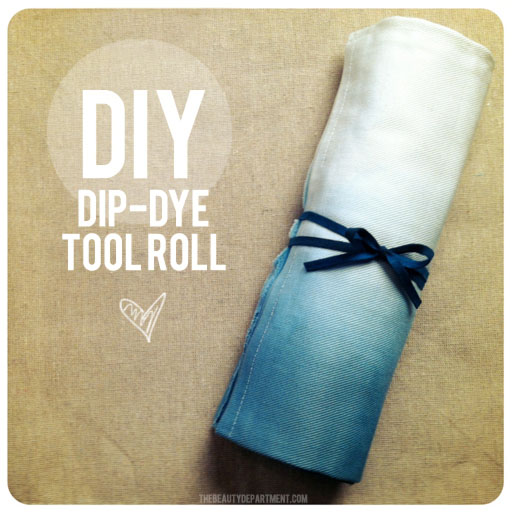
DIY: MAKEUP BRUSH ROLL
This is by far the most ambitious tutorial we’ve ever done on TBD, but we think you guys might be ready for something a little bit more challenging. This DIY dip-dye brush roll is such a good gift and you can do it in any color you want. I picked white + teal, which is probably not the smartest for makeup brushes but it looks the prettiest! Besides, I’ll probably use it for hair combs, scissors and clips. In order to do this little project you must have/use a sewing machine. I know that sounds a little old school, but it’s time to bust it out and bring it back! If you don’t know how to sew, maybe you collaborate with a friend, mom, aunt, grams… whoever’s got the ol’ Singer. Here we go!
(TOTAL TIME: It took about 2 hours to make this and photograph the process, so it should only take you about an hour. Then allow 3 hours for air drying after the dye process.)
THE SEWING PART:
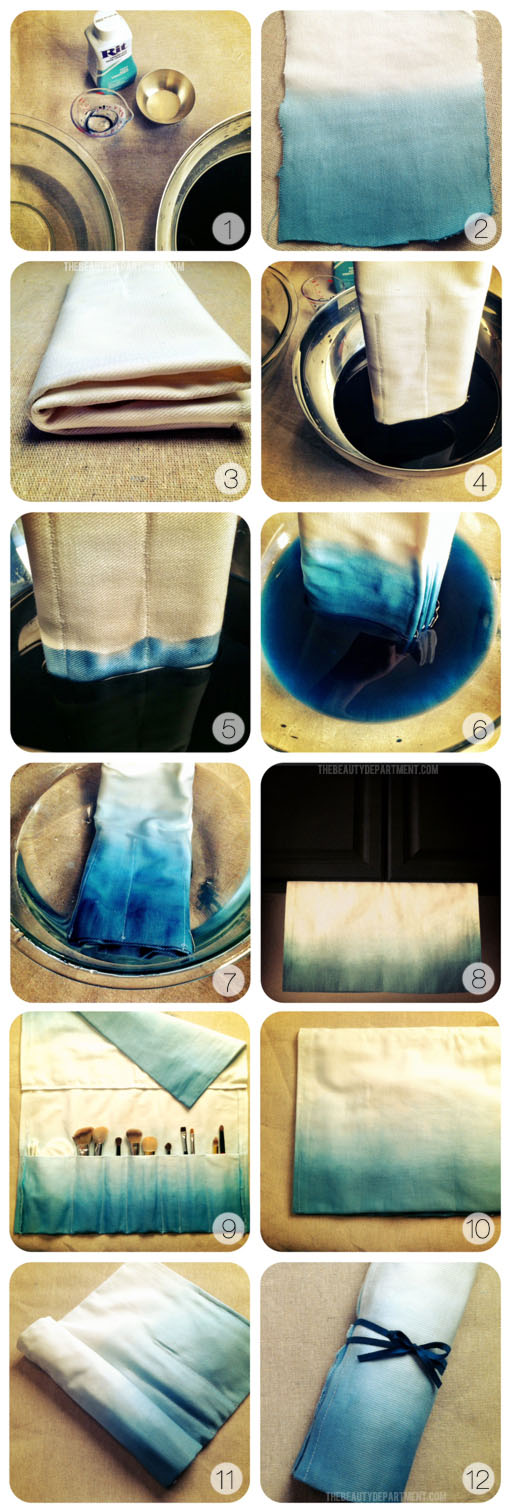
- Using a sturdy fabric of your choice (I used white denim), cut an 18″ wide x 41″ panel.
- Fold the bottom 5 inches up.
- Use “Stitch Witchery” fusible bonding tape to help keep that piece in place temporarily.
- Once you’ve laid your bonding tape under, go over it with an iron. I used it on high because denim is pretty heavy.
- Next, take your brushes and lay them just above the line where you just ironed your bonding tape.
- Then fold that up and over the brushes. 5 inches should be just the right amount of pocket depth for most makeup brushes (not including travel size).
- Now fold 1/2″ on both sides inward. I ironed it to get it to stay perfectly. Then use push pins to keep your 1/2″ fold in place. See photo!
- Ok go sew those sides from top to bottom! I did a heavy duty stitch because I wanted this tool roll to be really durable.
- After sewing, your sides should look like this!
- Grabbing your fabric from the top, fold it down 10 1/2 inches.
- Now fold that extra 1/2″ underneath and iron it into place. Pin it and sew straight across.
- Here’s the fun part. Put your brushes in the pocket and decide how far apart you want each section. They can be evenly spaced out or you can make some bigger and some smaller. I did a variation of sizes because some of my brushes are huge and some are really thin. I used a pencil to make my guides.
- Back to the sewing machine. Sew your lines. I reversed over my line once or twice when I got to the very top to make sure it’s totally sturdy.
- Filler up and make sure everything fits properly. If you don’t want to do the dip-dye, then you’re done! Otherwise here’s part two!
THE DIP DYE PART:
- Fill one bowl with 5 cups of ice cold water. Fill the other bowl with 5 cups of boiling hot water and a tbsp of salt or vinegar.
- Try doing a test strip of fabric before you do your tool roll using instructions 3-12. That way you can get some practice and develop your own favorite technique for dip-dye. I think everyone will have a slightly different way of doing this. When you think you’re ready and have had enough practice, grab your tool roll.
- Fold the tool roll in half (vertically) and then in half again (vertically).
- Slowly ease the tool roll, bottom first, into the hot dye water.
- Hold it in one place. You’ll see the fabric start to soak up the dye and it will slowly keep creeping up. You want to see it creep up about an inch above the dye water.
- Now switch it over to the bowl of ice cold water. Obviously your cold water will start to turn blue too. That’s okay because it won’t be very strong. Dip into the cold water just a little higher than you did in the hot water. Go back and forth between the hot bowl and the cold bowl as many times as you want. Keep going higher and higher. Toward the end, I like to dip just the bottom couple inches into the hot dye because it makes the bottom extra dark.
- Once you’ve acheived your desired look, run your tool roll under cold water with the lighter side up. Once the water runs clear, get a clean bowl of ice cold water and soak it for one minute.
- Hang it dry somewhere. I used my kitchen cabinets over my sink to hold it while it dries. You could also slip a hanger through the middle of the tool roll and hang it outside. During this drying process, the colors will bleed into eachother a little more and even themselves out. It always looks a little harsh when it’s wet but it softens up as it dries and the dye becomes significantly lighter in color too. This took about 3 hours to fully dry.
- Once it’s completely dry, fill it back up however you wish with your brushes.
- Pull the top half down and cover your brushes.
- You’ll probably want that flap (the seamless side) to be the outside of your tool roll, otherwise you’ll see the seams on the outside.
- Last but not least, tie it up! I used a long faux leather strip to tie a bow, but you can use anything you want.
If you attempt this, you’re quite a lady (or man)! Tell us how you feel about sewing projects below in a comment. It’s okay if you hate them, we just want to know if we should do more of these. Good luck everyone!


