hair
DIY FLOWER WRAPPING FOR HAIR
As we all know, it’s wedding/prom season, and who doesn’t love adding a fresh flower to their hair when heading to a special event? Luckily, my best friend used to be a florist and she taught me how to do this early on in my hair career. This trick has come in handy SO many times and I’m really excited to share it with you considering DIY wedding and prom accessories are at the peak of popularity. Here’s how it’s done:
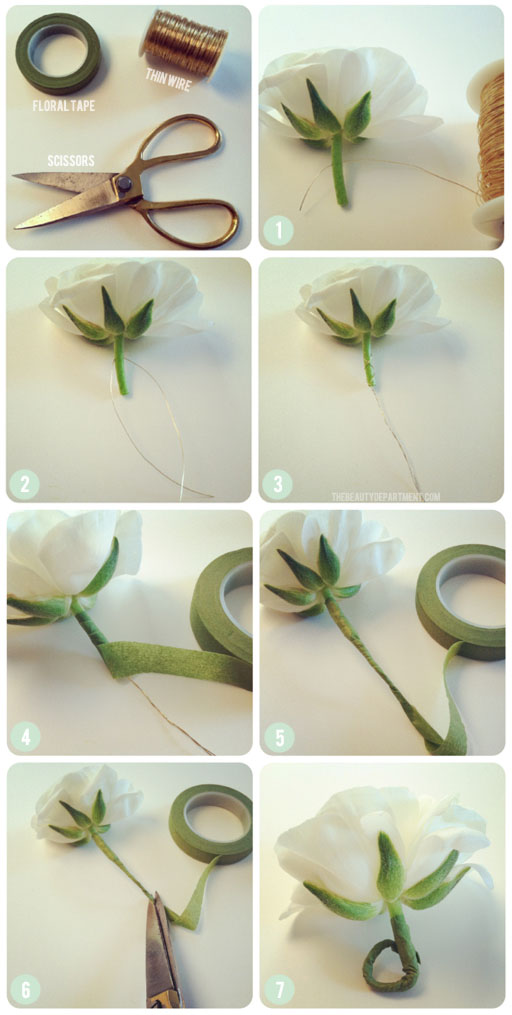
TOOLS: Floral tape (can be purchased at craft stores, some flower shops or google it and buy it online), beading wire or floral wire, scissors and whatever type of flower you want. Note: use an open flat flower so it sits nicely against the head. My favorites are gardenias, fully bloomed and opened roses, lisianthus, orchids, and here I used ranunculus.
- Push your thin wire through the stem, close to the base of the flower. If the stem is stiff, try poking a needle through first.
- Drag the wire through and cut it. The 2 sides of wire should be even. Make the wire is an inch or 2 longer than the stem so you’ll have room to curl the bottom up like you see in picture # 7.
- Twist each wire around the stem a couple times, and then twist them around each. This will make the wire twice as strong.
- Grab your floral tape and start wrapping the stem from the base of the flower.
- Keep wrapping until you get all the way to the bottom.
- Snip the tape right where you feel the wire ends.
- Now roll the bottom back up to make a loop.
Now, use that loop to secure the flower with a bobby pin. This makes the flower more sturdy and it stays alive longer because you’re not crushing the stem. (And always try to avoid spraying hairspray on the petals of your hair flower!) Good luck, pretty people!


