nails
NAILED IT!
And the winner of our “Nail It” contest is… Jenna Day! We absolutely loved this mixed metals manicure. So, congrats to you Ms. Jenna!! We can’t wait to try this one out for ourselves… and now you guys can too! Thank you to everyone that entered our contest. Going through all of the submissions was really fun and I was very impressed all of your entries.
XO Lauren
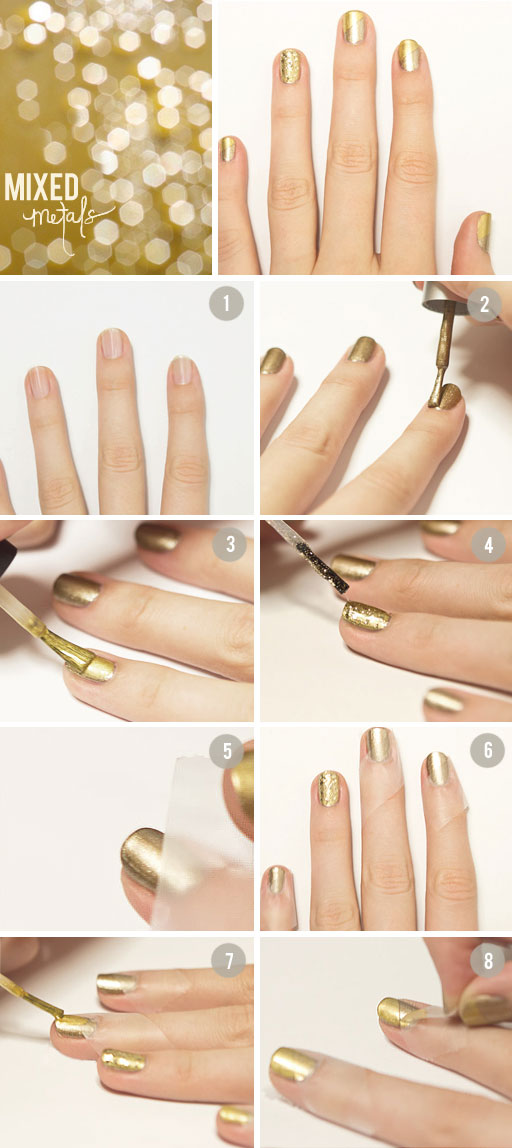
MIXED METALS MANI:
TOOLS
Base & Top Coat Nail polish
Dark Gold Nail polish
Light Gold Nail polish
Gold Glitter Nail polish
Tape
STEPS
1. Start with bare nails shaped and ready for your manicure and apply a base coat.
2. Once the base coat has dried, apply 1-2 coats of your darker gold. If it has good coverage just stick with one coat because it will dry faster.
3. On your ring fingers, apply the light gold.
4. Get your glittery gold and apply it on top of the light gold on your ring finger. I like the look of the sparkles on the light gold. It’s totally up to you if you want to keep the darker gold as your base. {Make sure your dark gold nails dry completely before the next step! This can sometimes take up to 30 minutes}
5. Take a piece of tape and put it on your nail at an angle of your choice. It’s easiest to tape all of your nails at once so are not messing around with tape with wet nail polish.
6. Apply the light gold as if you are painting your whole nail. You do not want the paint to be too thick so try to stick to just one coat.
7. Let the paint dry for about 5 minutes and then remove the tape slowly.
8. Apply a top coat and your manicure is complete!!
XO Jenna


