hair
1 INSIDE OUT FRENCH BRAID & 2 TWISTS
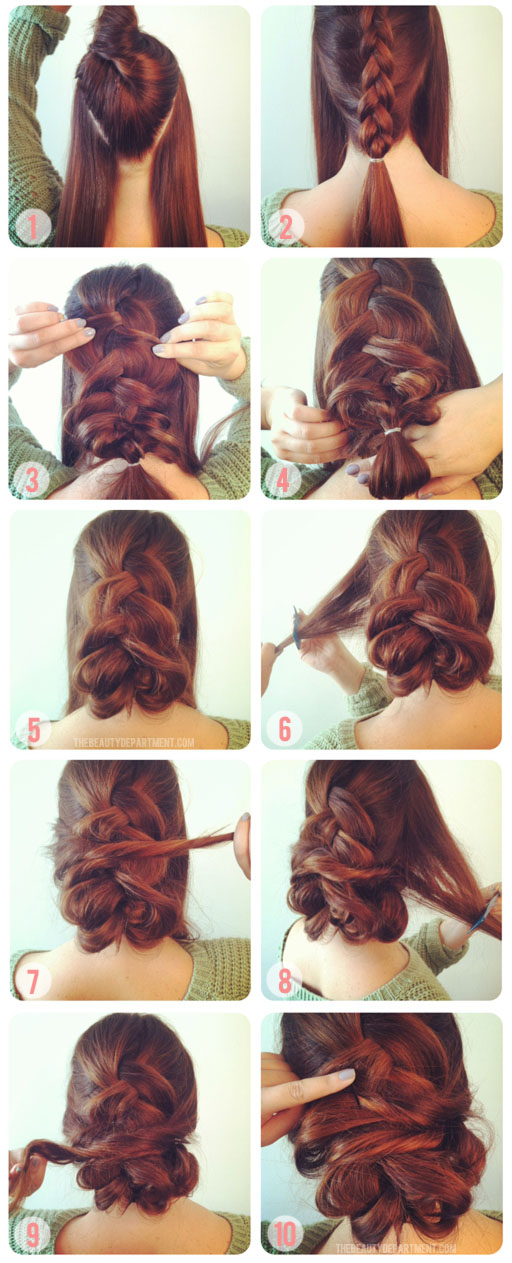
Let’s say your friend is getting married. And let’s say she asks you to help her with her hair. And let’s say you panic. This has happened to a few people I know recently, and it’s mostly because destination weddings are such a big thing right now. People are getting married in rural countryside barns, on a lake, in the forest and on scenic hill tops all across the country. Often when a bride is getting hitched in the middle of nowhere, they’ll call on their most stylish friend to help them look their best on the big day. This little updo should be a great help in a situation like that because if you know how to french braid inside out, then you can probably master this updo with a teeny bit of practice. Obviously, the girl in the photo is doing this on her own hair (which is why we create these tutorials), but you can easily translate to this look and do it on a friend’s hair. My biggest tip with this ‘do is to let it be a little messy. It’s very “swirly” which leaves room to improvise as you go. We didn’t use a ton of hairspray here, but if you have a lot of layers you may need to use a little more as you go for added support. This can be done on hair that’s shoulder length and longer. All you need is a little something to tuck under like you see her doing in photo 4. Alright… here we go!
- Divide your hair diagonally into 3 sections as you see above. Push the 2 side sections in front of your shoulders.
- Do an inside-out french braid. You’ll want to go just past the bottom hairline so you have room to tuck the hair under later.
- Gently and slowly, pull the inside out french braid apart. Keep pulling until it starts to look like loose “loops”. Note: This is where it gets tricky for those of you with layers, but don’t worry too much. You can always twist them back into the mix later! Besides, some loose pieces are good! Use a little hairspray here to secure if you feel the need!
- Now tuck the tail of the braid under and pin it using large bobbypins for strong support.
- Once you’ve tucked it and pinned it, the back of your hair should look like this. (See photo 5)
- Next, take one of your side pieces and give it a light tease to thicken it up.
- Twist it and drape it across the back. Pin it behind the ear on the opposite side and blend the ends of it into one of the loops from the braid.
- Repeat the teasing process of the other side.
- Drape it across the back and over the previous twist (you can even weave it through a loop if you wanna get really fancy), then pin it behind the ear on the other side. Again, blend the ends of the twist into one of the loops from the braid.
- Add extra bobbypins to secure any pieces that feel unstable. Spray all over with a firm holding hairspray at the end!
You’re such a good friend.


